 simpler
The interface
The Simpler window always has the same shape, whatever you are doing. Spend ten minutes here and you will never wonder where a command is: you will know which area to look at.
The eight areas of the window#
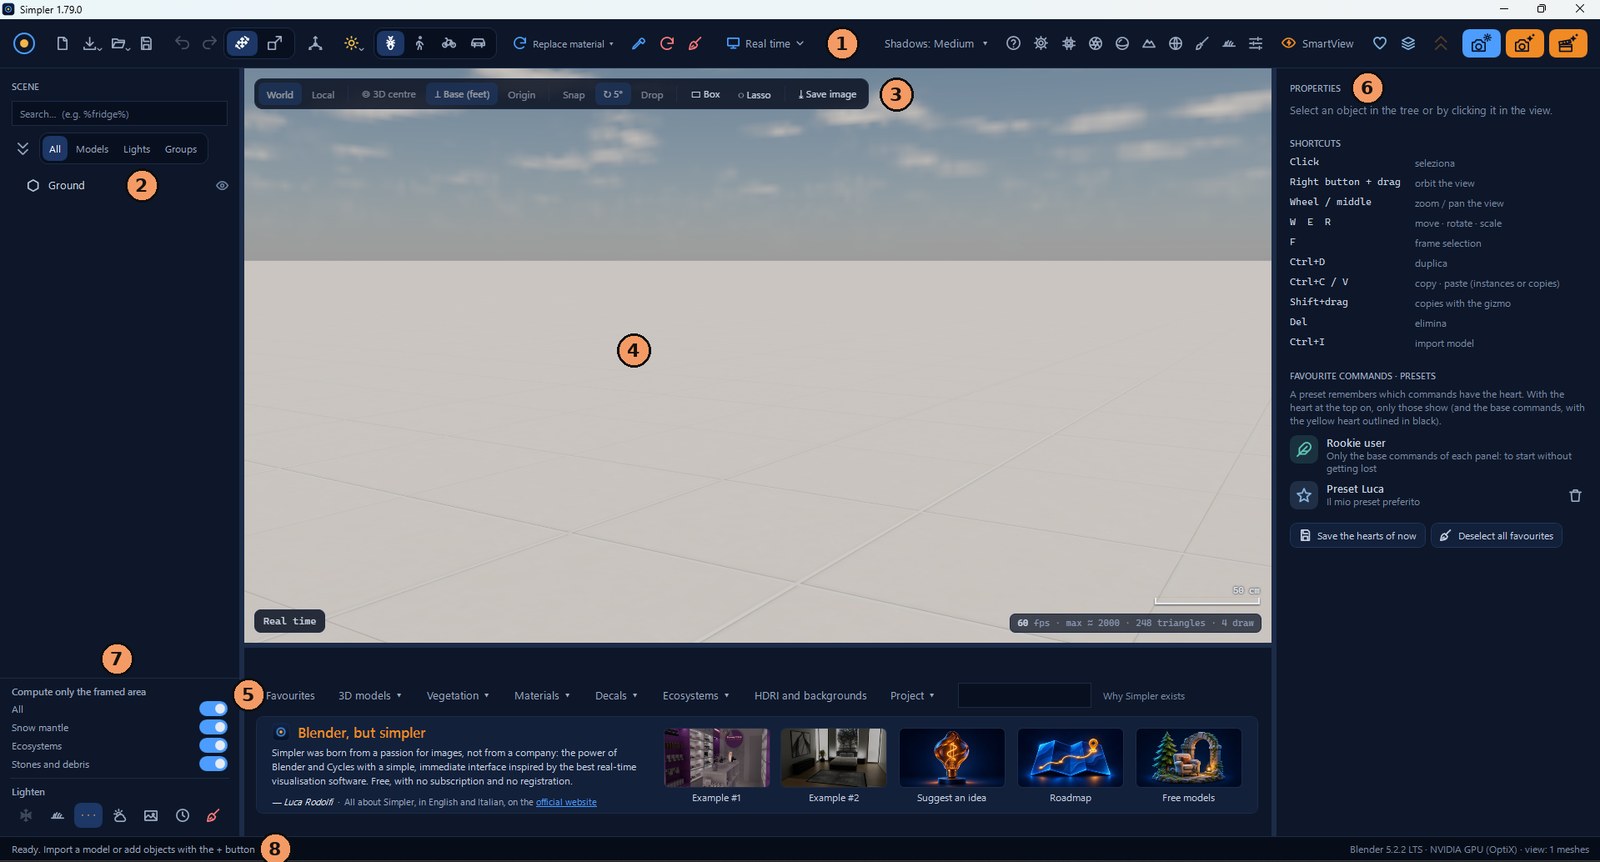
Think of the window as a desk. In the middle there is your scene, the 3D view (4), where you move around and compose. Above it, the toolbar (1) holds the tools you use all the time and the buttons that open the big panels. Right on top of the view, a smaller view bar (3) decides how objects move when you drag them.
On the left, the scene tree (2) lists everything in the scene, like the table of contents of a book. On the right, the side panel (6) shows the details of what you selected, or the panel you opened from the toolbar: materials, environment, landscape, camera, rendering. At the bottom, the library (5) is your warehouse of models, plants, materials and skies.
Two areas are easy to overlook but precious. At the bottom left, Compute only the framed area and Lighten (7) keep heavy scenes fluid. And the status bar (8) at the very bottom tells you in plain words what Simpler is doing at every moment.
The borders between the areas can be dragged to make room where you need it. The library grows by whole rows of tiles: drag its top edge and it clicks into place.
The toolbar, left side#

The left half of the toolbar is about files and hands-on work. Here is what each button does.
- The Simpler logo.
- New starts an empty scene (Ctrl+N).
- Import ▾ brings models into the scene or into the library, and opens the tools that look after your library. See Projects and files.
- Open ▾ is the file menu: open, save as, recent projects, the example scene, settings and information.
- Save saves the project (Ctrl+S).
- Undo (Ctrl+Z): you can go back many steps, so experiment freely.
- Redo (Ctrl+Y).
- Move and rotate (W): the gizmo shows arrows to move and arcs to rotate.
- Scale (R).
- Move the pivot, for when a model turns around the wrong point (a door that should turn on its hinges).
- Add a light ▾: Omni, Spot, Area, Disc, LED strip or Sun.
- The four wheel speeds: the ant for tiny steps on a detail…
- …walking…
- …bicycle…
- …and car, for long steps across a landscape.
- How a dropped material is applied ▾: only on the piece under the mouse, or replacing that material everywhere. See Materials.
- Eyedropper: click a surface and its material opens at once.
- Redraw the view, if the real-time view ever looks incomplete.
- Free memory: cleans out what the scene no longer uses, after showing you what and how much.
- View ▾: Clay, Real time or Path tracing.
The toolbar, right side#

The right half opens the panels, and ends with the three buttons that produce images.
- Shadows ▾ in real time (Off, Medium, High, Ultra), Quality ▾ in path tracing.
- What's new: what changed in each version.
- Settings.
- Resources: how hard your graphics card and memory are working.
- Camera: lens, depth of field, perspective and image format.
- Materials.
- Landscape: terrain, rocks, sea and coast.
- Environment: sun, sky, clouds, fog, rain, snow and night.
- Scatter (B): paint or line up models on surfaces.
- Ecosystems: ready-made vegetation to place on any surface.
- Rendering: settings of the real-time view and of path tracing.
- SmartView: set up big scenes without waiting. See Rendering.
- Favourite commands: show only the commands with a heart.
- Presets of favourites.
- Close all sections of the open panel (click again to reopen them as before).
- Final render (blue).
- AI image (orange when your OpenAI key works).
- AI video (orange).
The view bar#

The view bar answers one question: when I drag the gizmo, what exactly happens? World and Local (1–2) decide whether the arrows follow the axes of the world or of the object; Q switches between them. 3D centre, Base (feet) and Origin (3–5) decide where the gizmo sits. For anything that stands on a floor, people, furniture, lamp posts, choose Base: the gizmo goes to the feet, so the object turns on the spot and stays on the ground.
Snap (6) makes movements click in steps and scaling in 10% steps, and the rotation button (7) cycles 5°, 15°, 45°, 1° and off. Holding Ctrl while you drag inverts the snapping for a moment, which is handy for a quick fine adjustment. Drop (8) lets the selection fall onto the surface below: a vase onto a table, a car onto the road.
Box and Lasso (9–10) are for selecting many objects at once by drawing a rectangle or a free shape; Ctrl or Shift add, Alt removes, and Esc gives you back the normal view navigation. Finally Save image (11) saves the view exactly as you see it, the path tracing reached so far or the real-time view: perfect for sending a quick draft.
The scene tree#
The scene tree is the list of everything in your scene. Imported models appear as branches you can open down to the single pieces, so you can find «the left door of the wardrobe» even in a model with hundreds of parts. Copies of the same model are gathered under a line «N instances», which keeps the list short.
The search box at the top finds objects by name and accepts % as a wildcard: %fridge% finds every object with «fridge» in its name. The buttons All, Models, Lights and Groups filter the list, the eye on each line hides or shows an object, and the number on the right tells you how many pieces or copies a line contains.
The side panel and the favourite commands#
When nothing is selected, the side panel shows the keyboard shortcuts and the favourite presets. As soon as you click an object it shows its properties, and when you open a panel from the toolbar it shows that panel.
Every command in every panel has a small heart in front of it, and this is one of the nicest ways to make Simpler your own. Click the heart of the commands you use most: they become favourites. When you switch on the heart button in the toolbar, every panel shows only your favourites plus a few basic commands that are always there (their heart is filled with a dark outline). Sections without favourites disappear, and a panel that had twenty commands may show four.
Save the hearts of now keeps your choice as a preset, so you can have one for interiors and one for landscapes. The preset Rookie user shows only the basic commands of each panel and is ideal for your first days; Deselect all favourites starts again from zero. Hearts are kept on your computer and apply to every project.
The status bar#
The status bar is Simpler talking to you. It says «Ready» when you can act, «Path tracing · pass 3/5» while an image is being refined, «Saving…» when it is writing your file. When the engine is busy the mouse pointer shows it too, so you always know whether to act or wait a moment.
On the right it shows the Blender version (for example Blender 5.2.2 LTS), the device used for rendering (for example NVIDIA GPU (OptiX)) and how many meshes the view is drawing.
Keyboard shortcuts#
You can do everything with the mouse, but a few keys save a lot of time:
- Right button + drag orbits the view; the wheel zooms; the middle button + drag pans.
- W E R: move · rotate · scale. F frames the selection.
- Ctrl+D duplicates; Ctrl+C / Ctrl+V copy and paste (instances or copies); Shift + drag the gizmo leaves copies behind.
- Del deletes; Ctrl+G groups the selection.
- Ctrl+I imports a model; Ctrl+N, Ctrl+O, Ctrl+S, Ctrl+Shift+S: new, open, save, save as.
- Ctrl+Z / Ctrl+Y: undo / redo.
- Space switches to path tracing; B opens the scatter brush; Esc leaves the current tool.