 simpler
Scatter and ecosystems
Nature is made of many similar things: blades of grass, stones, trees. Placing them one by one would take forever. The Scatter places them for you, painting with the mouse or following a shape; the Ecosystems keep a whole mix of plants ready to drop onto any surface.
The Scatter panel#
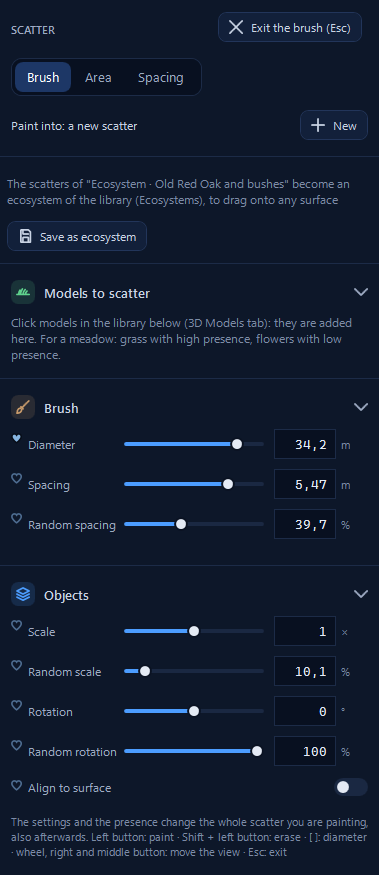
Open the Scatter with the brush button in the toolbar, or press B. First you choose one of three ways of working, each made for a different job. Brush is like a spray can: you paint grass, flowers or stones with the mouse wherever you want them. Area is for filling a region: you draw its outline and Simpler fills it, a wood, a field, a flower bed. Spacing places objects along a line at regular distances: lamp posts along a road, a row of cypresses, the posts of a fence.
Every scatter you create becomes a group in the scene tree, for example «Scatter Area 1», with the number of pieces next to it. The line Paint into tells you which one you are adding to; New starts another one and Delete removes it.
Choosing what to scatter#
The models come from the library. With the Scatter open, a click on a model in 3D models or Vegetation does not put it in the scene but adds it to Models to scatter. You can add several, and each one has its Presence, how often it appears. For a meadow, for example, take three kinds of grass with high presence and two kinds of flowers with low presence: the result is a natural lawn sprinkled with flowers. Under each model, Advanced holds its own settings, like size and rotation, and the trash can removes it from the mix.
The settings and the presence apply to the whole scatter you are working on, even after you painted it: you can thin out the flowers of a meadow at any time.
Painting with the brush#
With the brush, the left button paints and Shift + left button erases. [ and ] make the brush smaller and larger, and you can still move the view with the wheel and the right and middle buttons. Esc leaves the brush.
Diameter is the size of the brush in metres, Spacing the distance between the pieces and Random spacing how irregular it is. In Objects you give the pieces some variety, as in nature: Random scale makes some bigger and some smaller, Random rotation turns them in different directions. Align to surface decides how pieces stand on a slope: on, they lean with the ground, like grass and stones; off, they grow straight up, like trees.
Filling an area#
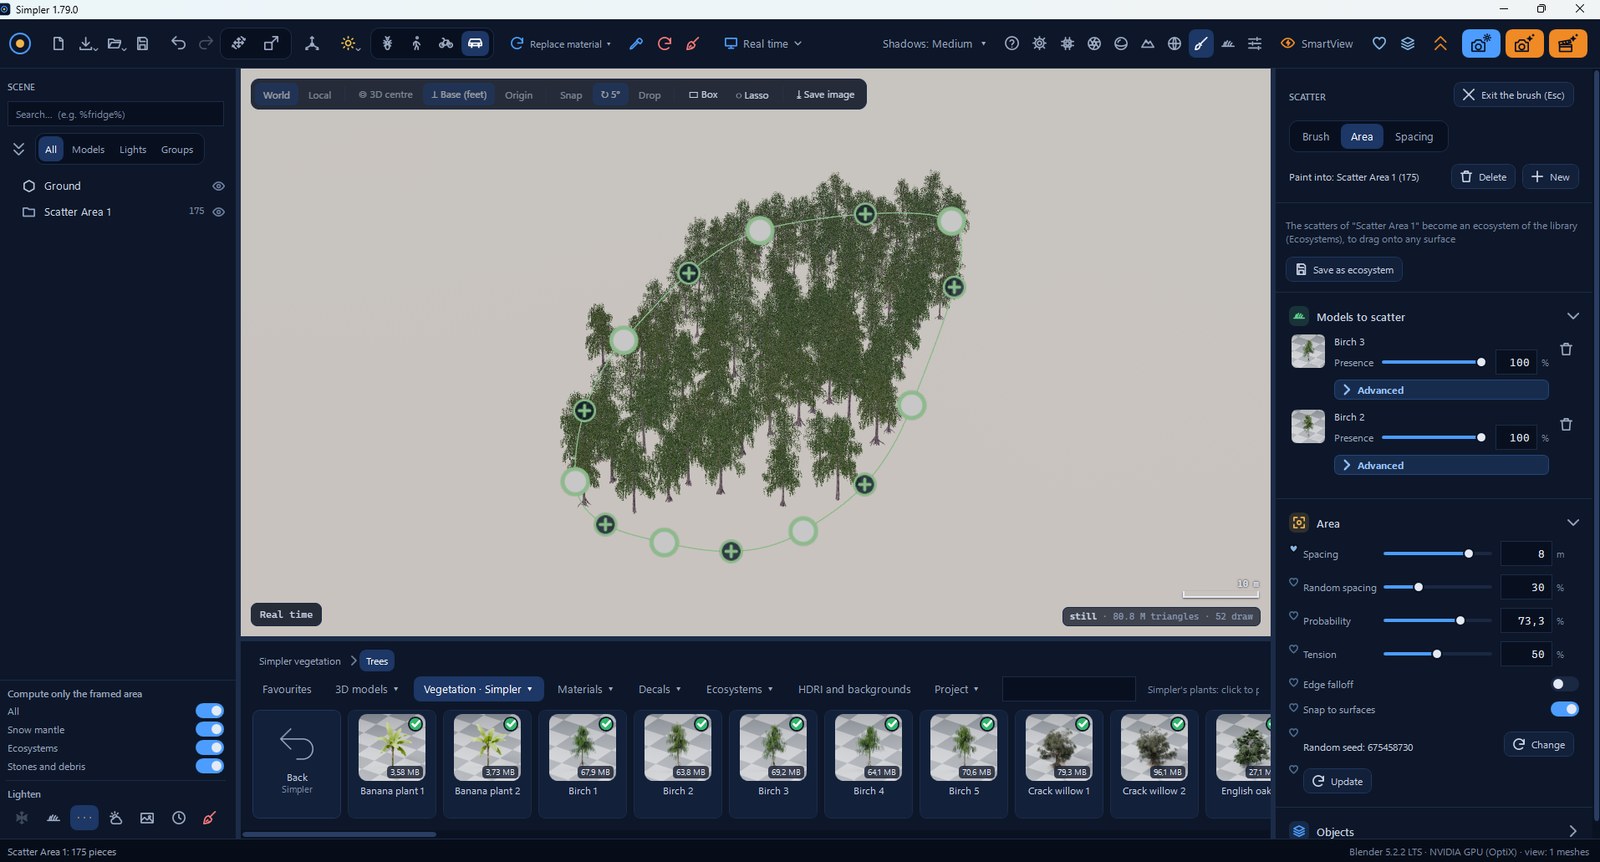
- Choose Area and click the models you want, here two kinds of birch.
- Click on the ground to place the points of the outline. To close it, click the first point again, double-click, or press Enter or Esc; Backspace removes the last point if you make a mistake.
- The area fills at once. The outline stays editable: drag its points to change the shape, click a + to add a point, Del removes the selected one.
Then shape the wood with a few sliders. Spacing sets how dense it is and Random spacing how irregular. Probability leaves some places empty, which makes clearings. Tension makes the outline more or less rounded, Edge falloff thins the trees near the border, as in a real wood, and Snap to surfaces keeps everything on the ground. If you do not like how the trees fell, Change tries another arrangement; Update applies your changes.
To keep a house free of trees, select it and turn on Exclude from Area and Spacing in its properties: the pieces that would land on it go onto the ground below instead.
Lining up with Spacing#
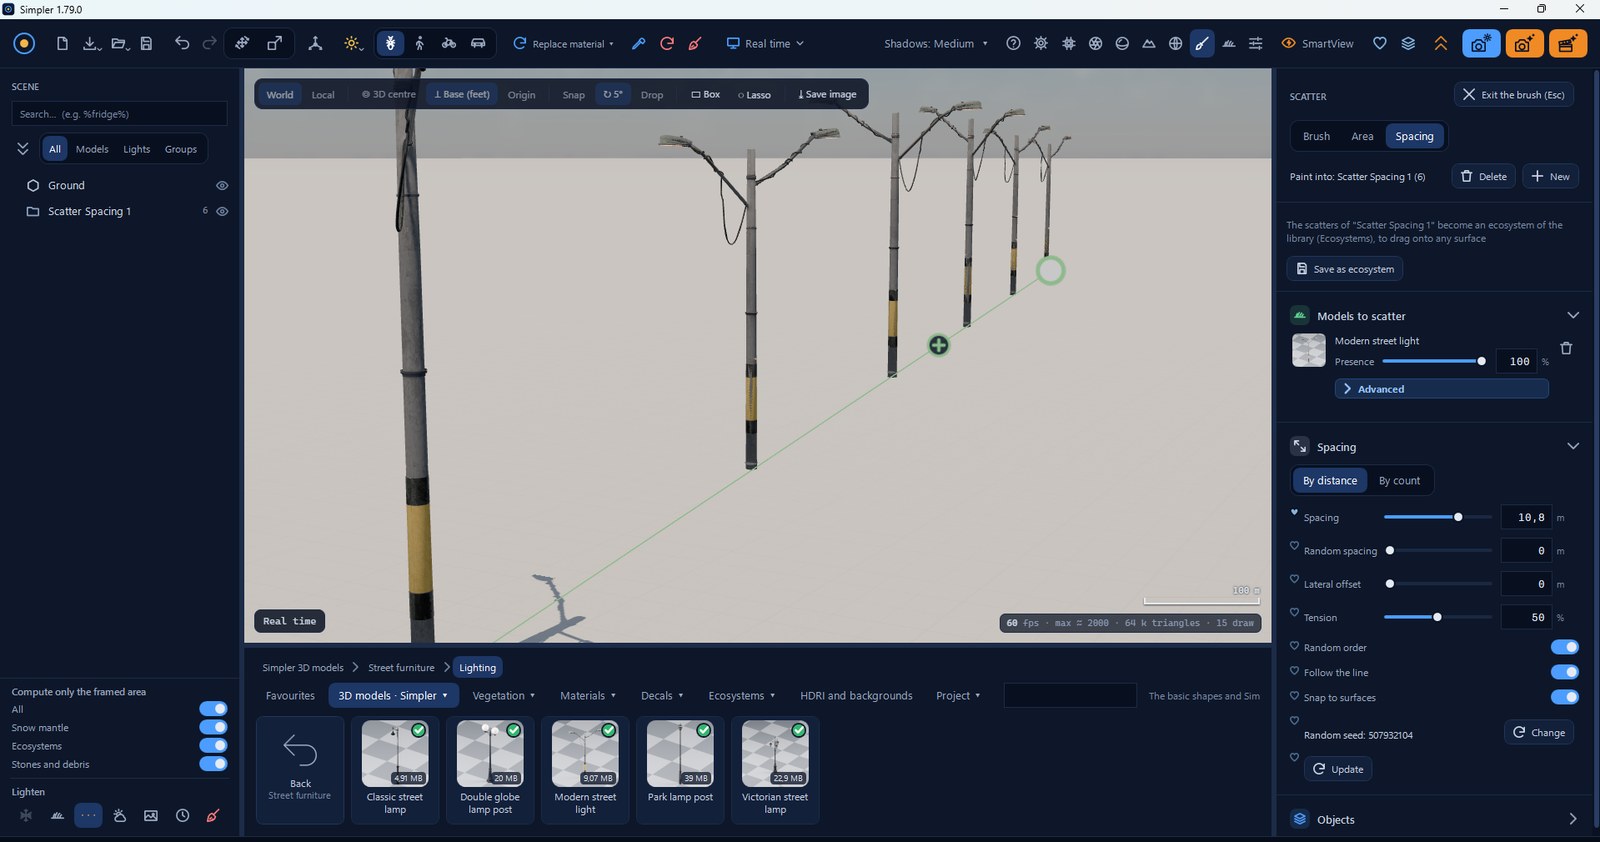
Spacing is made for everything that comes in rows. Choose Spacing, click the model, then click on the surfaces to draw the line point after point; finish with a double-click, a click on the last point, Enter or Esc, or click the first point to close the line around a square.
You then decide the rhythm: By distance, one lamp every 10 metres, or By count, exactly 12 lamps along the road. Lateral offset moves them to the side of the line, Tension decides how the line curves between the points, and Follow the line turns every object with the line, so the lamps always face the road even around a bend. With several models, Random order mixes them.
From scatter to ecosystem#
When a scatter turns out well, a mix of grass and flowers you spent time balancing, you will want it again. Save as ecosystem in the Scatter panel saves it in the library as an ecosystem, ready to be dragged onto any surface of any project.
Ecosystems#
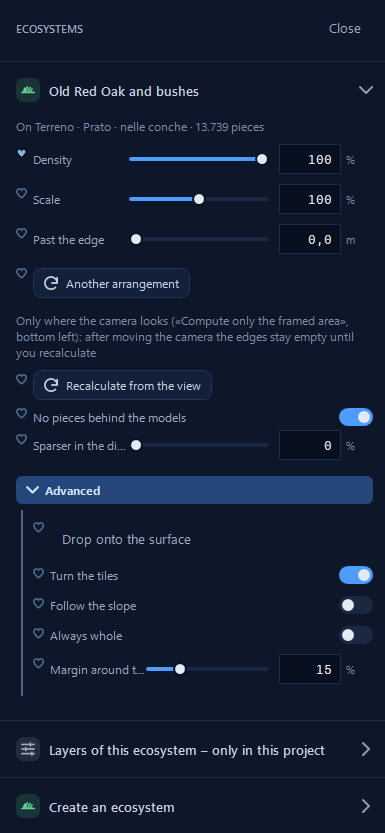
An ecosystem is a ready-made piece of nature, organised in layers like a real one: tall trees, then bushes, then grass and stones. Drag it from the library onto a surface, or select the surface and use Place on the selected object, and the surface is covered in a few seconds. The Ecosystems panel tells you where it is and how many pieces it made, for example «On Terrain · Meadow · in the hollows · 13.739 pieces».
The Ecosystems panel then lets you adapt it to your scene. Density and Scale act on everything at once. Past the edge lets the plants go a little beyond the border of the surface, so the edge looks natural instead of cut with scissors. Another arrangement keeps the same mix with new positions. Two switches save a lot of work for your computer: No pieces behind the models and Sparser in the distance leave out the plants nobody would see.
With Compute only the framed area ▸ Ecosystems on, the pieces are made only where the camera looks, so even huge ecosystems stay light. After you move the camera the edges stay empty until you click Recalculate from the view; before a final render Simpler recalculates them by itself for the camera of the render.
The layers of an ecosystem#
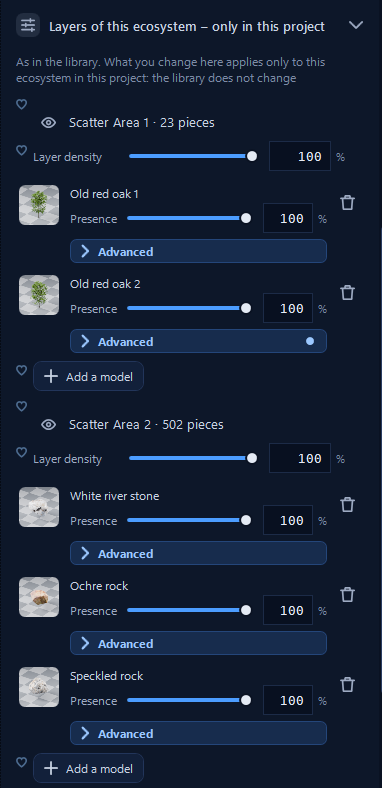
Layers of this ecosystem – only in this project opens the ecosystem and shows each layer with its models and their presence. This is where you adapt a ready-made ecosystem to a particular project: fewer oaks, more bushes, a different kind of stone. Everything you change here applies only to this project, and the library keeps the original.
Creating your own ecosystem#
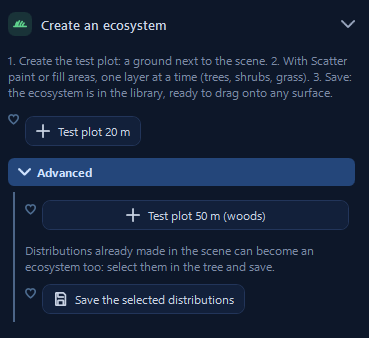
- Click Test plot 20 m (or Test plot 50 m (woods) under Advanced, for big trees): a piece of ground appears next to your scene.
- With the Scatter, paint or fill areas on the plot one layer at a time: first the trees, then the bushes, then the grass. Each layer is a scatter.
- Save: the ecosystem is in the library, ready to be dragged onto any surface.
If you already made some beautiful scatters in a scene, you do not need the plot: select them in the tree and click Save the selected distributions.
An ecosystem with two layers, a few large trees and a layer of stones and rocks, dragged onto the lawn of a terrain becomes a natural park in a few seconds, with the pieces made only where the camera looks.
Editing an ecosystem you already have#
A click on the thumbnail of an ecosystem opens it in the Ecosystems panel, with its layers, the models of each layer and how much they weigh. To change it for good, Edit on the plot puts it back on the test plot exactly as it was saved, one scatter per layer. Change it with the Scatter, then Save changes to update it (same name and folder, new thumbnail) or Save as new to keep both versions. Right-click ▸ Copy and Paste in the library also make a copy «(copy)» to experiment on.
Simpler's own ecosystems, in the red folder, are locked: you can look at them and copy them, then edit your copy.