 simpler
Rendering
Simpler has three ways of showing your scene and one way of making the final picture. This chapter tells you when to use each one, and how to get a clean image in the least time.
The three views#
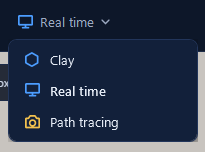
The three views are three tools, and choosing the right one at the right moment is the secret of working fast. Real time is the view you use most: fast and fluid, made for moving around, placing objects and trying materials. It is a preview, though, and its shadows, reflections and glass are approximations, and the clouds are painted.
Path tracing is the photographic view. Here Cycles follows the physical path of the light: glass refracts, light bounces from wall to wall, the sun shines through the leaves. It is what your final image will look like, so this is where you judge light and materials. Press Space to switch. A label in the view tells you how far it has got: «Path tracing · pass 3/5 · refining…», then «Path tracing · ✓ done · 256 samples». Every change you make restarts from the first pass, which is quick and grainy, and the image cleans up pass after pass.
Clay shows every piece in plain grey with its outlines, without textures, lights or shadows. It is the lightest view, perfect for very heavy scenes and for judging shapes and composition without being distracted by colour. Selection, gizmo and copies work as usual.
In the real-time view you can also read the frames per second and «max ≈», how many frames your graphics card could draw with this scene. When nothing moves, it says «still»: the view is not redrawing, and your graphics card rests.
Compose in real time, judge in path tracing. Path tracing uses all of your graphics card, so go back to real time when you are moving many objects.
SmartView#
In a big scene, with snow, rain, a coast and a forest, every small change can make Simpler recalculate a lot of things. When you are just arranging the scene, that is wasted time. The orange SmartView button is made for this moment: while it is on, you can insert, move and change materials as usual, but the shadows of the view are off and rain, snow, coast and path tracing are not recalculated after every change.
When you have finished arranging, click SmartView again: everything is recalculated once, with all your changes. Remember that SmartView is about speed, not accuracy, so judge lights and materials with it off.
The Rendering panel#
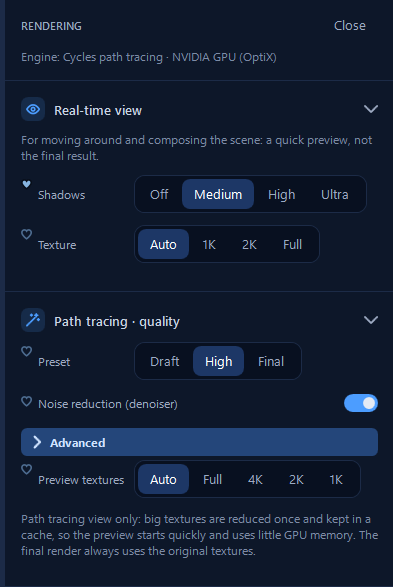
Open it with the sliders button in the toolbar. It tells you straight away which engine and device are in use, for example «Cycles path tracing · NVIDIA GPU (OptiX)».
Real-time view#
Here you balance quality and fluidity of the real-time view. Shadows go from Off, the smoothest, to Ultra; Medium is a good compromise. Texture decides the size of the pictures in the view: if your graphics card has little memory, smaller textures keep everything fluid without changing your final image.
Path tracing quality#
The Preset sets the quality of the path tracing view: Draft to check things quickly, High for everyday work, Final for the best quality, more slowly. Leave Noise reduction (denoiser) on: an artificial intelligence cleans the grain of the image, and you get a clean picture with far fewer passes.
Under Advanced, Preview textures is a quiet helper for big scenes: for the path-tracing view only, large textures are reduced once and kept in a cache, so the preview starts quickly and uses little memory. The final render always uses the original textures.
Global illumination and bounces#
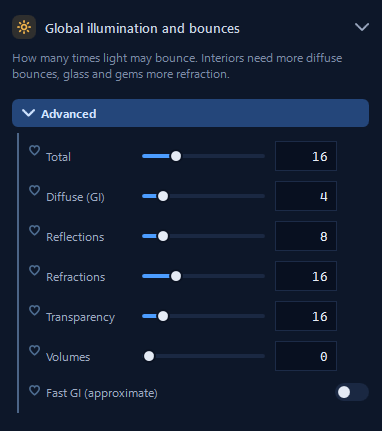
Light does not stop at the first surface it touches: it bounces and lights what is around. These sliders decide how many times it may bounce, by kind of surface: Total, Diffuse (GI), Reflections, Refractions, Transparency and Volumes. You rarely need to touch them, but two cases are worth knowing. An interior lit by a window needs enough diffuse bounces, because the light enters, hits the floor and bounces onto the walls and ceiling; with too few, the room stays dark. Glass and gems need enough refraction bounces, or they turn dark. Fast GI (approximate) replaces the farthest bounces with an approximation: faster, a little less faithful.
The values you set are the ones used, in the preview and in the final render. With glass or water in the scene the path tracing always uses at least the Refractions, otherwise glass and water would turn black.
Caustics#
Caustics are the patterns of light that glass, gems, polished metal and water focus onto the surfaces around them: the bright shape under a glass of wine on a tablecloth, the dancing net of light at the bottom of a pool, the reflection of a silver tray on the wall. They are a small detail that makes an image unmistakably real, and they are hard to compute, so Simpler lets you choose.
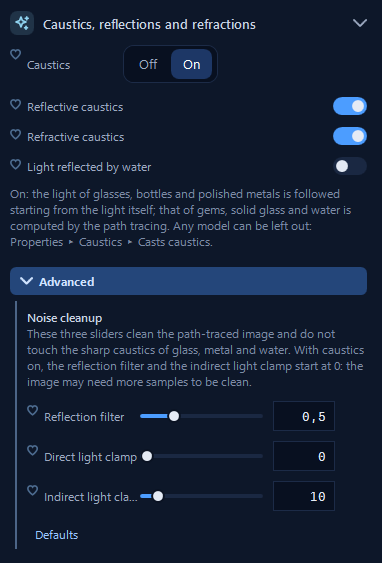
With Caustics Off the image is faster and cleaner. With On, Simpler follows the light of glasses, bottles and polished metals starting from the light itself, and the path tracing computes that of gems, solid glass and water. Reflective caustics and Refractive caustics let you keep only one of the two kinds. Light reflected by water adds the moving net of light that waves draw on nearby walls, under bridges and on the bottom: it needs water with real waves of 50 cm or more and light surfaces, and is visible only in path tracing.
A glass bowl or carafe on a table under a spot: with caustics On the bright ring and the pattern of the glass appear on the tabletop, as in a real photo. With caustics Off the glass leaves only its soft shadow.
Any model can be left out of the caustics, for example a glass in the background that adds noise but nothing to the image: select it and turn off Casts caustics in its properties.
Under Advanced, Noise cleanup holds three sliders, Reflection filter, Direct light clamp and Indirect light clamp, that clean the grain of the path-traced image without touching the sharp caustics. With caustics on they start at 0, so the image may need more samples to become clean; Defaults brings back the starting values.
Colour and exposure#
The last section of the panel develops the image: exposure, colour, look and lens effects. It is explained in Camera and colour.
Compute only the framed area#
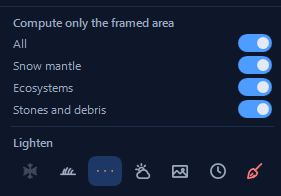
Some things are heavy to compute everywhere: the snow mantle on every roof, an ecosystem over a whole valley, millions of stones on a mountain. Yet the camera sees only a part of the scene. With the switches of Compute only the framed area, Snow mantle, Ecosystems and Stones and debris (or All together) are made only, or more finely, where the camera looks. The snow follows the camera by itself; the ecosystems wait for Recalculate from the view, and before a final render Simpler recalculates them for the camera of the render.
The final render#
When the image is right, click Final render, the blue button with the camera, in the toolbar. The window of the final render asks three things.
The size: Full HD 1920×1080 for the web, 4K 3840×2160, Square 3000×3000, Portrait 2160×2700, A4 print 300 dpi 3508×2480 for printing, Test 960×540 for a quick check, or a Custom width and height. If you chose an image format in the Camera panel, the sizes offered keep exactly its proportions. A small picture shows the view and the part that ends up in the image.
The quality: As configured uses the settings of the Rendering panel; Draft is fast, for checking; High is great for the web; Final is the maximum quality, more slowly. Samples is the maximum number of passes per pixel: more samples mean less noise and more time, but the denoiser and adaptive sampling stop earlier where the image is already clean.
The textures: Auto uses the biggest that fit in the memory of the graphics card, and gives a fast render even with huge models; Full uses the originals for maximum detail, but if they do not fit in video memory the render becomes very slow; 4K, 2K and 1K reduce them, with 2K already giving full detail for images up to about 4K.
Click Choose the file and render, choose where to save and the format (PNG 16 bit, JPEG at maximum quality, OpenEXR for HDR, or TIFF 16 bit), and wait. While it renders the commands are paused; Esc interrupts it.
Before a long render in 4K, make a Test 960×540 with the same settings: in a few seconds you see whether light, exposure and framing are right.
Saving the view#
For a quick draft you do not need the final render: Save image in the view bar saves the view exactly as it is, the path tracing reached so far or the real-time view.