 simpler
Working in the scene
This chapter is about your hands on the scene: moving around, choosing objects and putting them exactly where you want them. Everything can be undone with Ctrl+Z, so try things out without fear.
Moving around#
Moving in the view soon becomes second nature. Hold the right mouse button and drag to turn around the scene, turn the wheel to move forward and back, hold the wheel (middle button) and drag to slide sideways. To jump to an object, select it and press F: the view centres on it and frames it.
How far one turn of the wheel takes you depends on the wheel speed chosen in the toolbar, and choosing the right one makes a big difference. Close to a detail, a glass on a table or the handle of a door, use the ant: each step is tiny and you never overshoot. In a room or around a building use walking or bicycle. In a landscape several kilometres wide use the car, or you would be turning the wheel for minutes.
On a laptop without a mouse, turn on Settings ▸ Navigation ▸ Touchpad: two fingers move the view.
Selecting#
Click an object in the view, or its line in the scene tree. To add more objects, hold Ctrl or Shift while you click. When you need many objects at once, all the chairs in a room for example, use Box or Lasso in the view bar and draw around them. With several objects selected, the gizmo moves them together, as one object, around their common centre.
Imported models are made of pieces, and a click selects the whole model, which is what you want most of the time. To work on a single piece, say the cushion of a sofa, open the model in the scene tree and click the piece there.
Moving, rotating and scaling#
Choose Move and rotate (W) or Scale (R) in the toolbar and grab the gizmo. The arrows move the object along one axis, the small squares on a plane, the arcs rotate it. In scale mode the handles stretch along one axis and the centre scales everything; with several objects the scale is always uniform, so nothing gets deformed by mistake.
Where the gizmo sits matters more than it seems, and you choose it in the view bar. For anything that stands on a floor, people, furniture, lamp posts, trees, choose Base (feet): the gizmo goes to the lowest point of the object, so when you turn it, it turns on the spot and its feet stay on the ground. 3D centre is better for objects that float or hang, like a chandelier; Origin uses the point chosen by the author of the model.
Snapping and dropping#
When you need precision, turn on Snap: movements click in steps and scaling in 10% steps. The rotation button cycles 5°, 15°, 45°, 1° and off, so turning a chair exactly by 90° takes two seconds. If you need a small free adjustment for a moment, keep Ctrl pressed while you drag and snapping is inverted.
Drop is one of those commands you will use every day: it lets the selection fall onto the surface below it. Put a vase roughly above a table, click Drop, and it sits on the tabletop; it works just as well for a car on a sloping road.
Moving the pivot#
Sometimes a model turns around the wrong point. A door should turn on its hinges, not around its centre; a lamp arm should turn around its joint. Click Move the pivot: the gizmo turns violet and moves on its own, leaving the model where it is. Put it on the hinges and click the button again. From now on the door opens like a real door. Automatic pivot in the properties brings back the original one.
Copies and instances#
There are three ways to multiply objects: Ctrl+D duplicates the selection in place, Ctrl+C and Ctrl+V copy and paste, and Shift + drag on the gizmo leaves a copy behind you at every move, which is the fastest way to line up a row of chairs.
When you paste, Simpler asks whether you want instances or independent copies, and the difference is important. An instance shares shape and materials with the original: change the fabric of one chair and all the instances change with it, and twenty instances weigh on your computer almost as much as one. An independent copy is a separate object that you can change on its own. For a conference room with forty identical chairs, instances are the obvious choice.
In the scene tree the instances are gathered under a line «N instances»; right-click ▸ Select the original and all instances picks them all at once.
Groups#
Groups keep together the objects that belong together: a car with its headlights, a table with its chairs, a street lamp with its light. Select the objects and press Ctrl+G, or right-click ▸ Group into a new group. From then on you move them with one click and they never get left behind. To move an object into or out of a group, drag its line in the scene tree; Remove from group takes it out.
A group with its lights can be saved in the library as a single model, lights included: a lamp post saved that way comes back in every project already lit.
The right-click menu#
Right-clicking an object, in the view or in the tree, opens a menu that shows only the commands that make sense for what you selected, always in the same order. Here you find the everyday actions, Frame (F), Rename (F2), Hide, Duplicate (Ctrl+D), Delete (Del), together with some very useful tools: Merge into a single object (it appears only when there is something to merge), Drop onto the surface below, Optimize polygons… for heavy models, Save to library… to reuse the object in other projects, and Convert to vegetation to turn an imported plant into a real Simpler plant, with the Foliage material.
Right-click on the empty part of the tree to add a basic shape (plane, cube, sphere, cylinder, torus), a light or an empty group.
Object properties#
Select an object and the side panel shows its properties. Transformation gives you position in centimetres, rotation in degrees and scale, together with the real dimensions of the model, width × depth × height: it is the quickest way to check that a table imported from the internet is 75 cm high and not 75 metres. The number of triangles tells you how heavy it is.
The other sections are small switches that solve real problems. In Rain and snow, No rain keeps an object dry, for example the inside of a covered terrace; No snow keeps it free of snow, useful for windscreens and glass; Gives no shelter is for thin objects, like a pergola, that should not protect what is below them from rain and snow. In Caustics, Casts caustics decides whether a glass or a metal draws patterns of light around it. In the scatter section, Exclude from Area and Spacing tells the scatter to put nothing on this object, so trees planted around a house fall onto the ground instead of growing on the roof.
These are values of the model: if you save it in the library they travel with it and apply wherever you use it.
Lights#
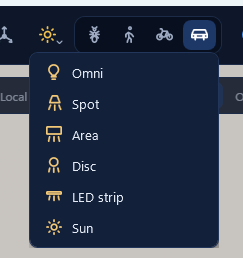
Click the sun with the small arrow in the toolbar and choose a type: the new light appears in the centre of the view. An Omni is a bare bulb that lights in every direction. A Spot is an adjustable cone, perfect for a ceiling spotlight on a dining table or a lamp on a painting; Cone angle and Edge softness decide how wide and soft it is. An Area is a luminous panel, the soft light of a photo studio, and a Disc is its round version for ceiling lights. The LED strip is long and thin, for shelves, coves and signs. The Sun has parallel rays and only its direction counts; you rarely need it, because the Environment already has a sun.
Light properties#
A light is defined above all by Power and Temperature. The temperature in kelvin gives the colour of real lamps: 1800 K is a candle, 2700 K a warm household bulb, 4000 K a neutral office light, 5500 K the sun, 6500 K daylight. Use Colour only for coloured light, like a gel on a stage spot. Size changes the character of the light: a small source gives crisp shadows, a large one soft light and gentle shadows.
The remaining switches help you cheat a little, as photographers do. Turn off Cast shadows for a fill light that brightens a corner without adding shadows. Turn off Visible to camera when you want the light but not the glowing panel in the picture, and Visible in reflections when its reflection would spoil a glossy surface. Reach makes the light fade to nothing at a distance, to keep it local.
Dusk to dawn deserves a special mention: a light with this switch turns on by itself only in the evening and at night, following the time of the Environment.
A street with lamp posts at sunset: give the bulbs of the lamps Dusk to dawn. Move the time of day in the Environment from 17:00 to 21:00 and the lamps switch on by themselves as the sky darkens, without touching them one by one.